how to configure a Simple Mail Transfer Protocol (SMTP) relay in Microsoft Office 365 ?
Configure SMTP Relay for LOB and Printers
Configure Internet Information Services (IIS)
- Configure the IIS SMTP relay server. To do this, follow these steps:
- Install IIS on an internal server. During the installation, select the option to install the SMTP components.
- In Internet Information Services (IIS) Manager, expand the Default SMTP Virtual Server, and then click Domains.
- Right-click Domains, click New, click Domain, and then click Remote.
- In the Name box, type *.com or domainname and then click Finish.

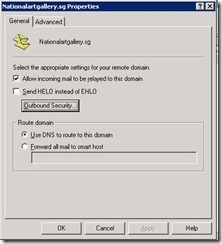
- Double-click the domain that you just created.
- Click to select the Allow incoming mail to be relayed to this domain check box.
- In the Route domain area, “use DNS to Route this domain”
- Click Outbound Security, and then configure the “Anonymous Access”
- Right-click the Default SMTP Virtual Server node, and then click Properties.
- On the Delivery tab, click Outbound Connections.
- In the TCP Port box, type 25, and then click OK.
- Click Outbound Security, and then configure the “Anonymous Access”
- On the Access tab, click Authentication, click to select the Anonymous access check box, and then click OK.
- On the Relay tab, select Only the list below, type the IP addresses of the client computers that will be sending the email messages, and then click OK.